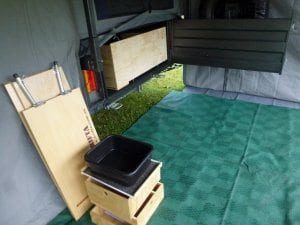
Take off the front, (easier) to unscrew the lid, take out the drawers and sink.. sit the kitchen on the floor of the trailer, about an inch from the hinge side.. any more than this, and the corner of the kitchen might hit the trailer when closing. You might have to take off the spare wheel if you have one on the tailgate..
You want the kitchen sitting flat on the floor on the plastic skids that are underneath.. some trailers, the floor isn’t quiet level..if so, pack the kitchen so it’s sitting as level as you can get it. here i’ve just packed up the front corner with a hex head driver bit.. this was perfect to get it sitting level..
Half close the tailgate, and see where the bolts might fit best.. basically, it doesn’t matter exactly where you put the bolts, but ideally two in the stove area, one behind the first and third drawer, and one down the bottom outside area.
It’s just important not to put a bolt where the ply joins together, you can tell this by the rows of screws… mark the position with a texta. Make sure the holes line up vertically and horizontally, as you’ll see the bolts from the rear.. (you might have to move the number plate, and fix it on again after)
Now, open the tailgate, drill the marked holes in the tailgate with a small sharp drill bit, say 4 – 5 mm… once this is done, make sure the kitchen hasn’t moved, close the tailgate carefully, and you want to mark the back of the kitchen where the holes are. You can do this by using maybe the texta if it will reach, or gently marking the kitchen with the drill bit.
Once you have marked the back of the kitchen, open the tailgate, and drill these holes slowly with the 5 mm bit.. now, put in the larger drill bit, carefully drill these holes again, and also the tailgate holes… brush away any shavings.
Best to get someone to help, but if you are on your own like i was this day, you can still do it no worries.. you can half close the tailgate, and lean one end of the kitchen on the floor of the trailer. then just get one of the bolts in in the stove area. Do up finger tight, then you should be able to get the other bolt in the stove area.. (best to use a flat washer both sides)
These two bolts are the most important ones, and easiest to get to.. close the kitchen a few times, you should just feel the bottom skids contact the floor.. just lightly, at this stage. If so, tighten up the bolts, if not, adjust them slightly up or down. once these are tight, then open the tailgate fully, and put the other two/three bolts in. do them up nice and firm. Best to use nyloc nuts.
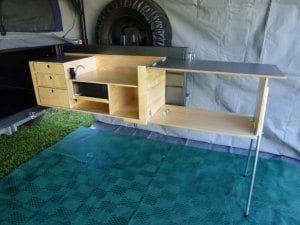
Well hopefully it should look something like this :) all done… put the kitchen back together.. sometimes, the edge of the trailer can be quiet sharp, as it’s the edge of the sheet of steel flooring.. if it’s sharp, it can dig into the plastic skids.. if so, just use a hammer, to tap down the steel edge, just where it would connect with the skids…
You can just make out where the bolts are.. two in the stove area, one bottom right, and behind top and bottom drawer.. these drawers stop about 30 mm short, with a paka in the end, so the bolt doesn’t hit the rear of the drawer.. the 2nd drawer, goes full length, so avoid putting a bolt here if you can. If you need to, when done, just slam the drawer against the bolt to see where it is (it will leave a mark), then drill a hole in the back to clear it..
Time to pack the kitchen with all your gear, then ready to go… sit back admire your work, and enjoy a beer :)